Programmatic SEO with Webflow CMS (2025): Step‑by‑Step Guide
Key Takeaways
- Programmatic SEO with Webflow is no longer just about scale, it’s about scale plus trust.
- AI can speed up research and content creation, but human oversight ensures accuracy, E-E-A-T, and long-term rankings.
- Webflow’s CMS and new apps make it easier to handle large builds with schema, accessibility, and automation baked in.
- Internal linking is critical. Programmatic pages need to point to category hubs and supporting content to rank well.
- Adding freshness signals (“Last updated 2025”) helps both Google and AI search engines surface your content.
So you want to implement Programmatic SEO in your Webflow website, but don’t know how to go about it? You’ve come to the right place.
Programmatic SEO is a powerful strategy that let’s you create a large number of web pages programmatically, using templates and data from a database. This is especially useful when you want to target a lot of long tail keywords and increase organic traffic in your website.
In this blog, we’ll show you a step-by-step process that you can follow along to set up Programmatic SEO on your Webflow site.
We'll look at two methods for this:
- No-code solution with Whalesync: This is great if you want a straightforward, no-coding-required approach to sync your data with Webflow, and it works seamlessly alongside popular Webflow integrations like Airtable or Zapier.
- Low-code method with Webflow API: This is great if you don’t want to use additional tools, and are comfortable with a bit of coding.
By the end of this guide, you'll be able to properly implement Programmatic SEO for your use cases, helping improve your SEO and attracting the right visitors. So, let's get started!
Step 1: Preparing Your Data
Let’s say you run a CRM SaaS business and want to create targeted landing pages for each of the industries you cater to. Different industries value different features, so each page will highlight a combination of 3-4 specific features from your feature list.
Here’s how we can implement programmatic SEO for this use case -
Choosing Base Keywords and Modifiers
First, you’ll need a list of long-tail keywords you want to go after. Here’s how you can build that -
Step 1: Choose base keywords: Base keywords are the main terms related to your product or service. For our CRM software example, the base keyword could be "CRM software."
Step 2: Choose your modifiers: Modifiers are additional terms that refine your base keyword to target specific industries or use cases. These can include industry names, specific features, benefits, and qualitative descriptors. For example:
- Industry-specific modifiers: "for real estate," "for healthcare," "for finance," "for education"
- Qualitative descriptors: "best," "top," "most effective," etc.
- Combining these could give you long-tail keywords like:
- "Best CRM software for real estate"
- "Top CRM software for healthcare providers"
- "Most effective CRM software for financial advisors"
Step 2: Organizing Your Data
Once you have your base keywords and modifiers, it’s time to organize them. This will help in creating structured and comprehensive content for your landing pages.
Here’s how you’ll do that -
Step 1: Keyword research: Use tools like Google Keyword Planner, Ahrefs, or SEMrush to find more long-tail keywords and search volumes related to your base keywords and modifiers. Once ready, compile a list of relevant keywords that people in different industries might be searching for.
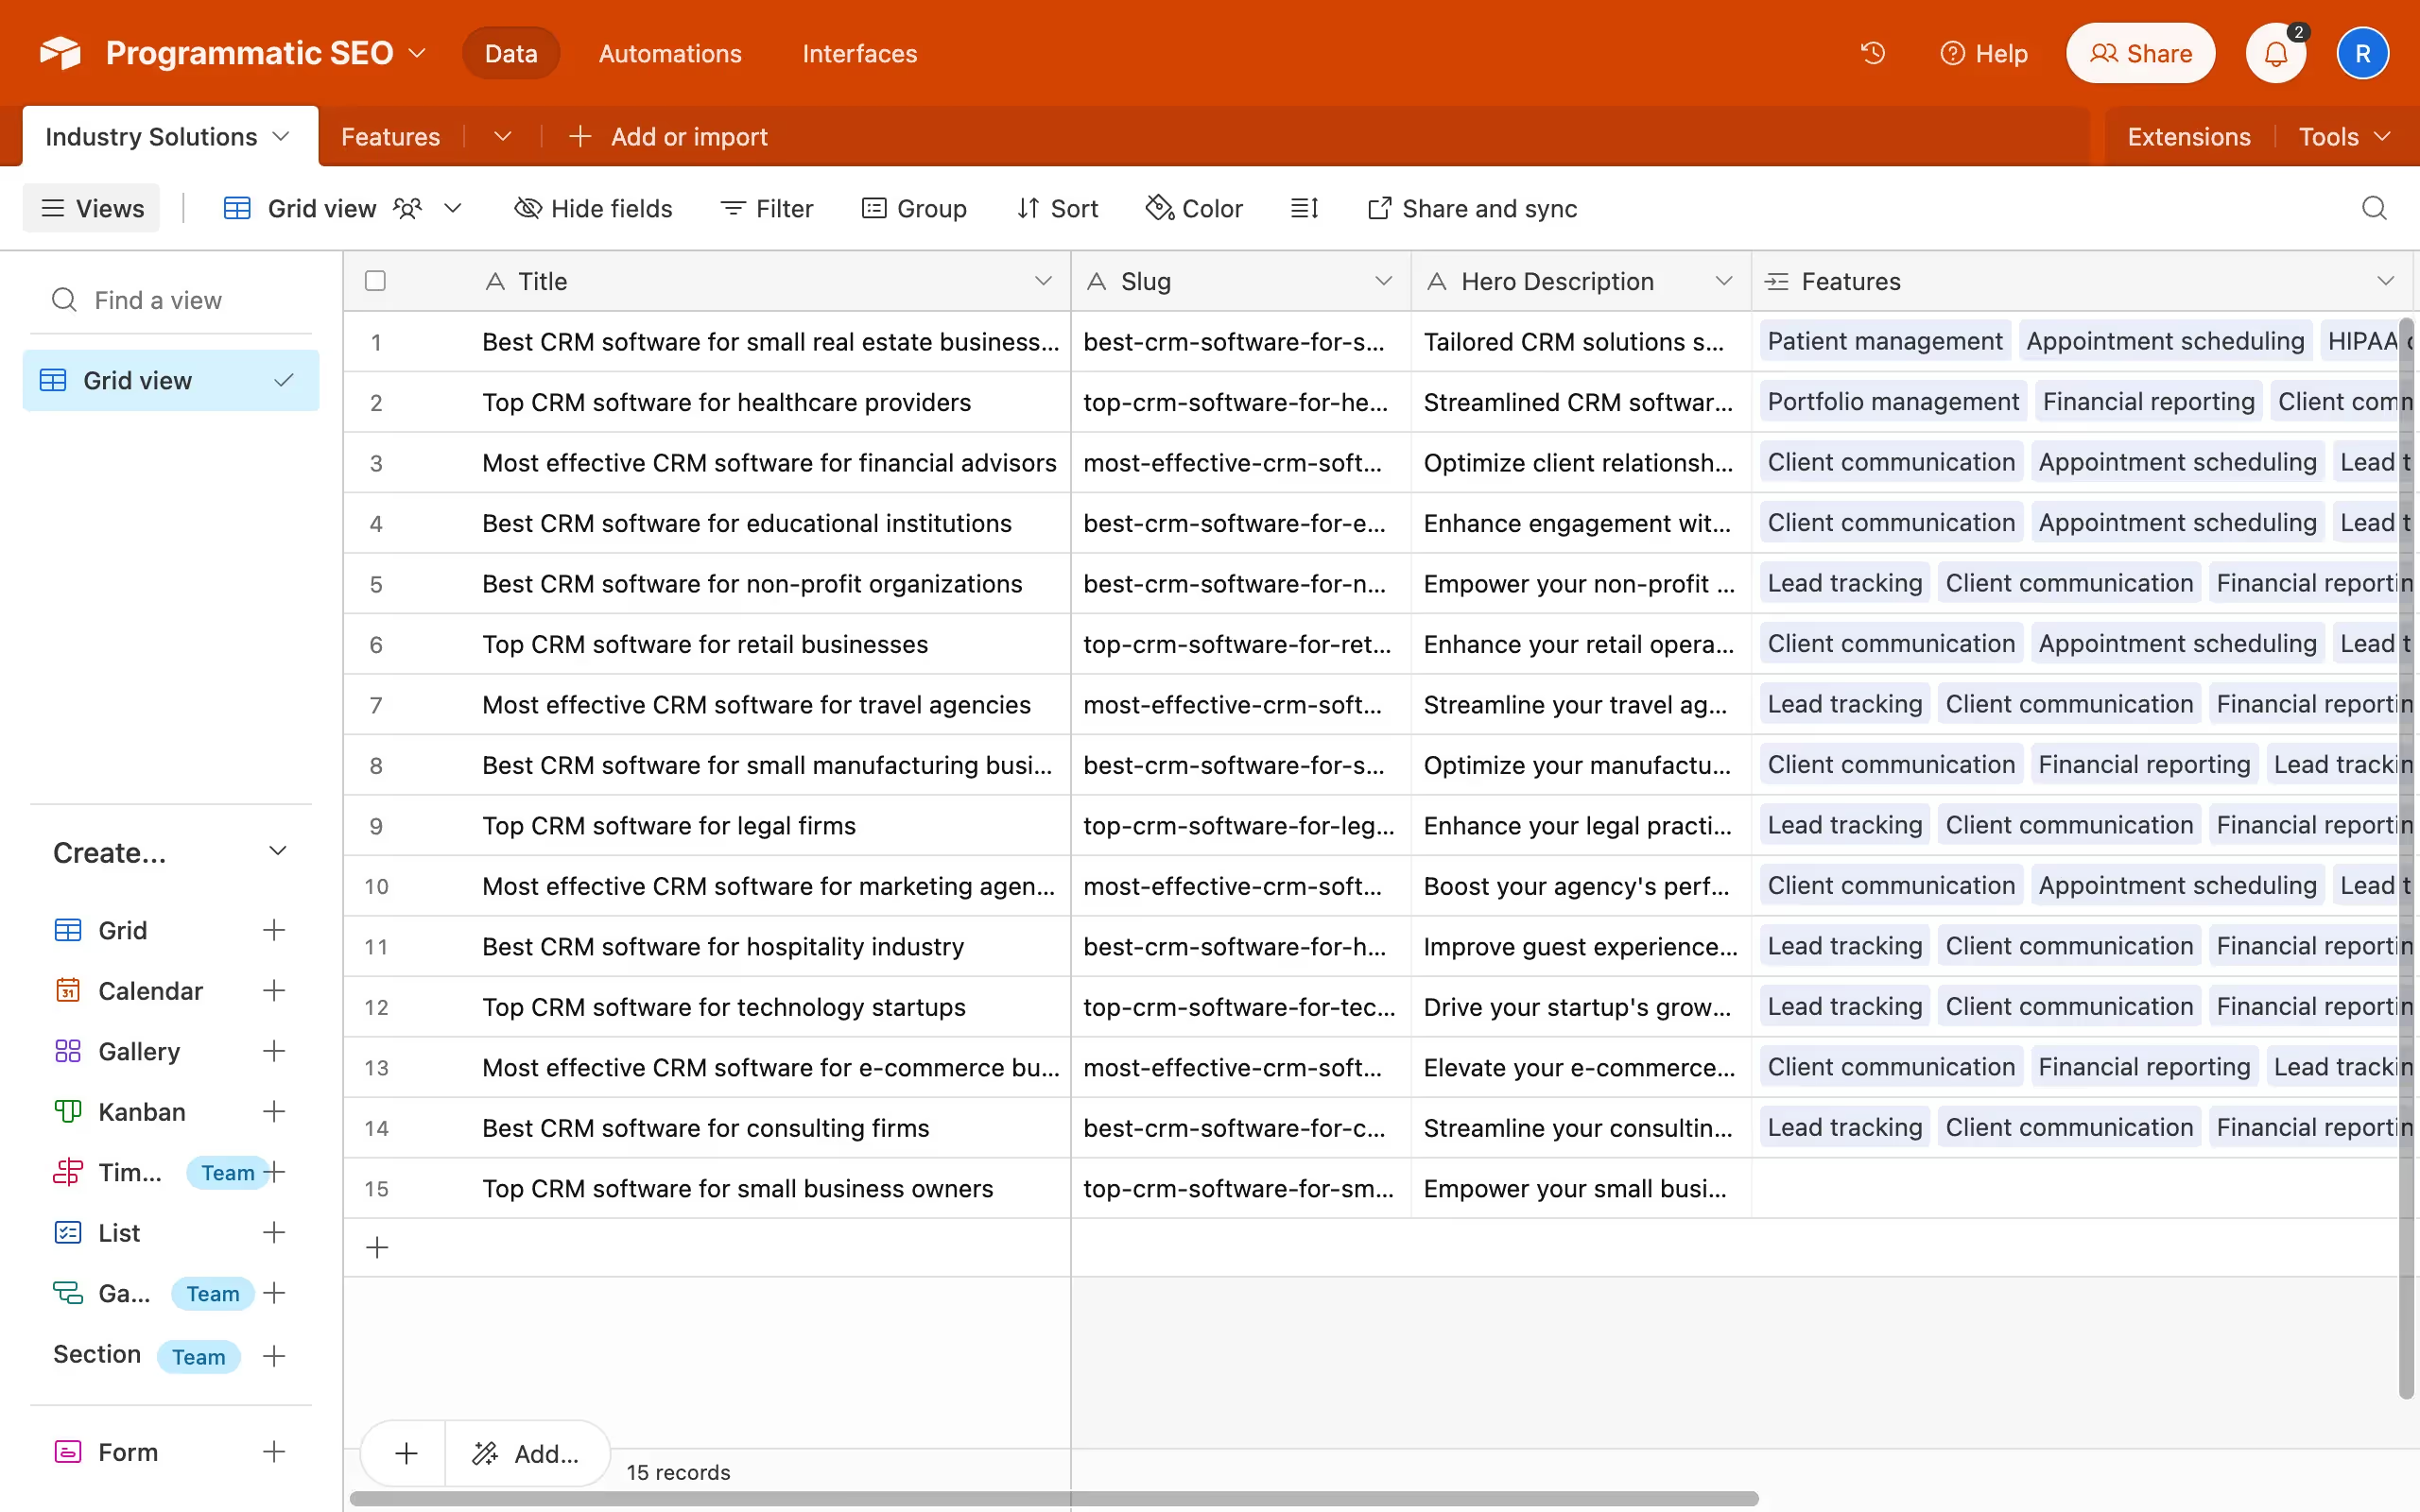
Step 2: Data organization: Bring this list of long-tail keywords on a spreadsheet like Google Sheets or Airtable(we recommend Airtable). Add the rest of the fields that you’ll need on your landing page.
For our CRM example, the fields might include Industry name, title, meta description, hero paragraph, image, slug, and 3-4 features(multireference)
Step 3: Adding content: Once you have fields finalised, you can start adding content for each landing page. You can generate some of the content like meta descriptions and hero paragraphs using AI tools like datafetcher, and even generate images right in airtable with tools like placid.app to reduce the manual effort.
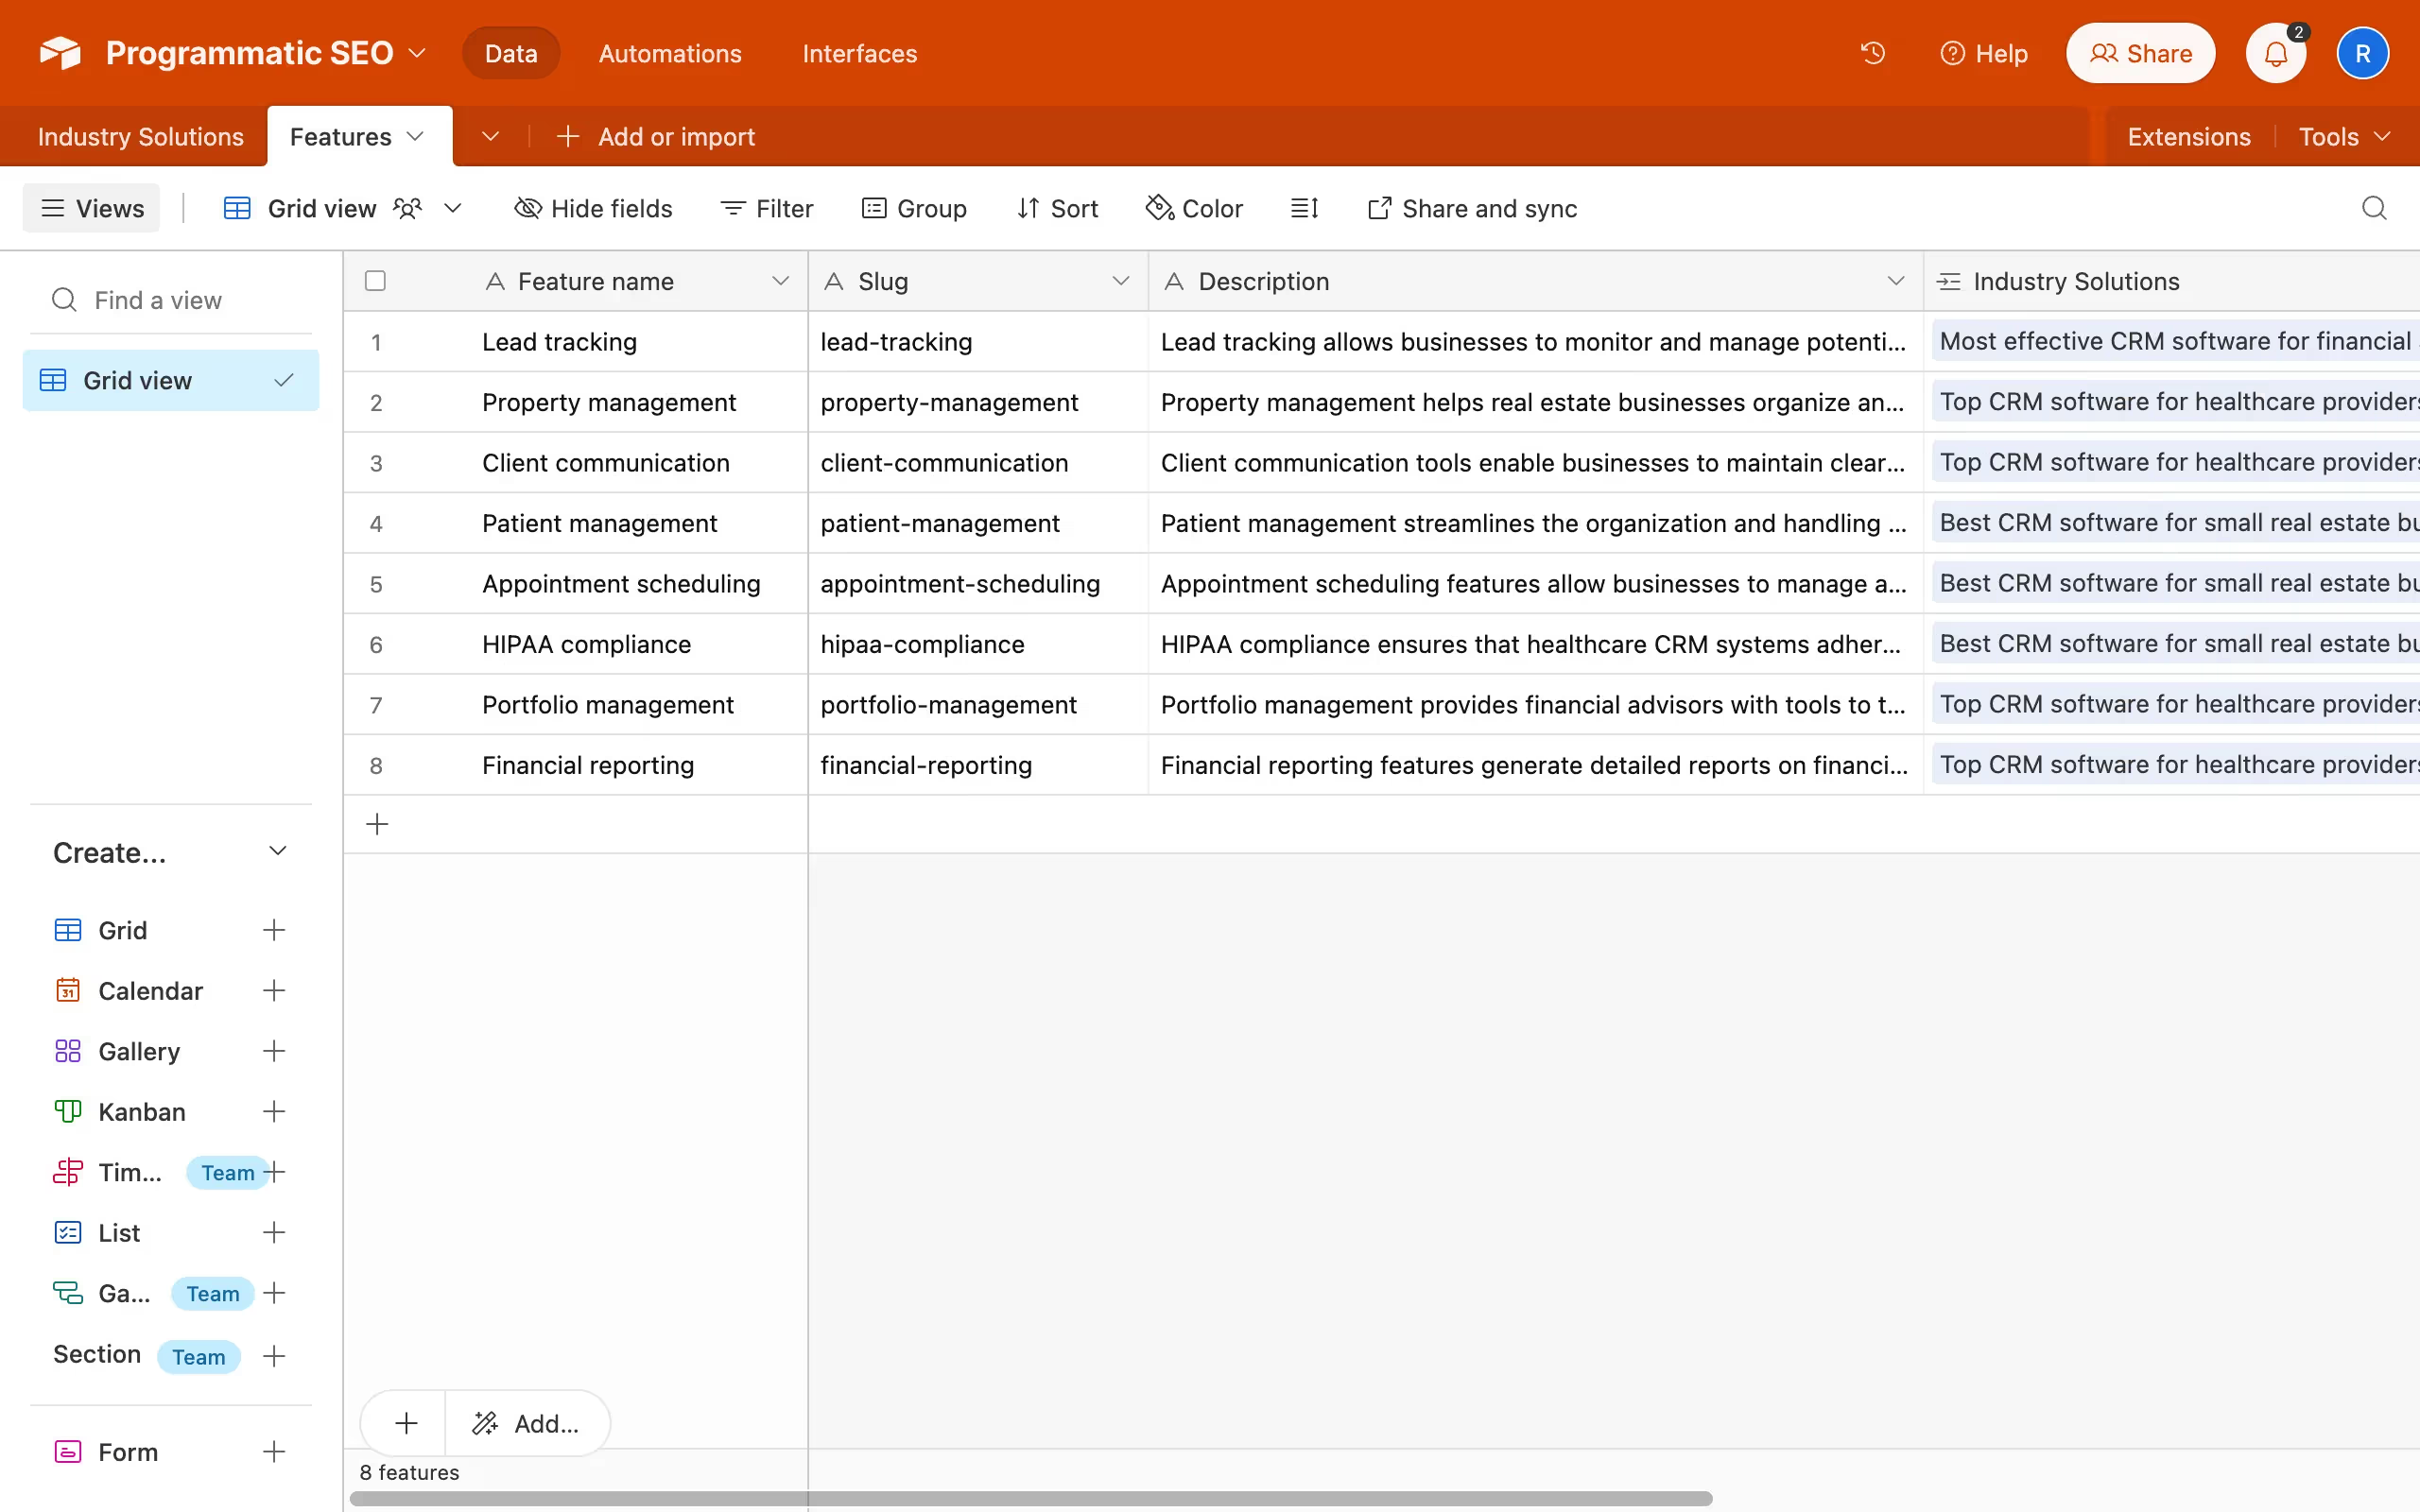
Create another table for features, where you’ll add the feature name and description for each feature.
Once you’ve added content for all the fields, it’ll look something like this -
Step 3: Setting Up Your CMS Page
Now that you’ve got your data organized, it’s time to set up your CMS collections in Webflow.
Creating CMS Collections
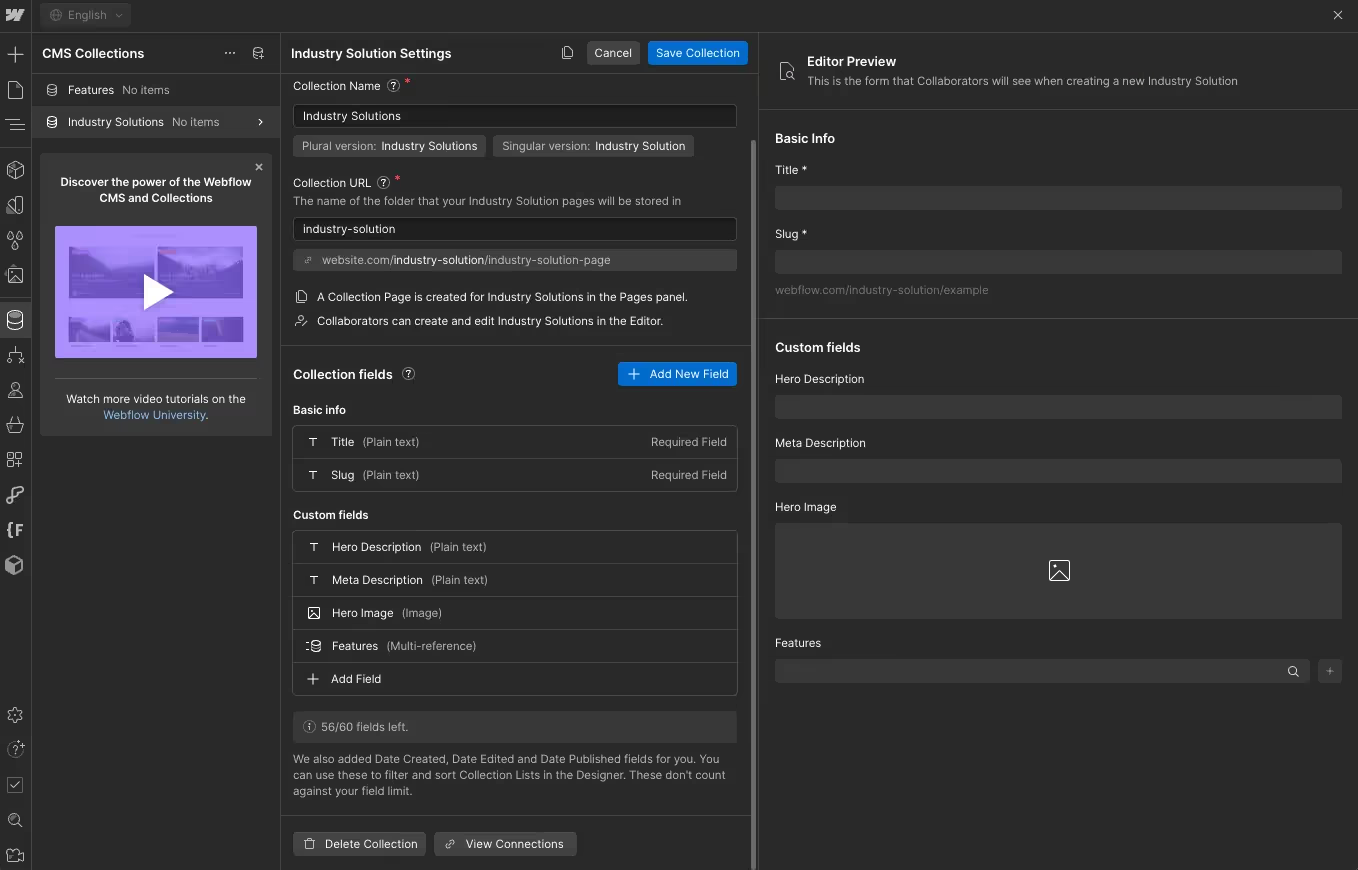
To map your Airtable’s content with CMS, you’ll need to add similar fields to your CMS collection.
Create a new collection, and name it ‘Industry Solutions’. Define fields that match the data you’ve organized in your Airtable. For our CRM example, the fields would include - Title, meta description, hero description, Features(multi-reference), image.
Create another collection called ‘features’, where you’ll add the feature’s name and description.
Designing Your Pages
Now that your CMS collections are set up, you can move on to designing the CMS pages where content will show up. Build the page to fit your brand, and connect the CMS fields with the design to fetch dynamic content.
Add at least one item in your cms collection to map the fields on your page’s design.
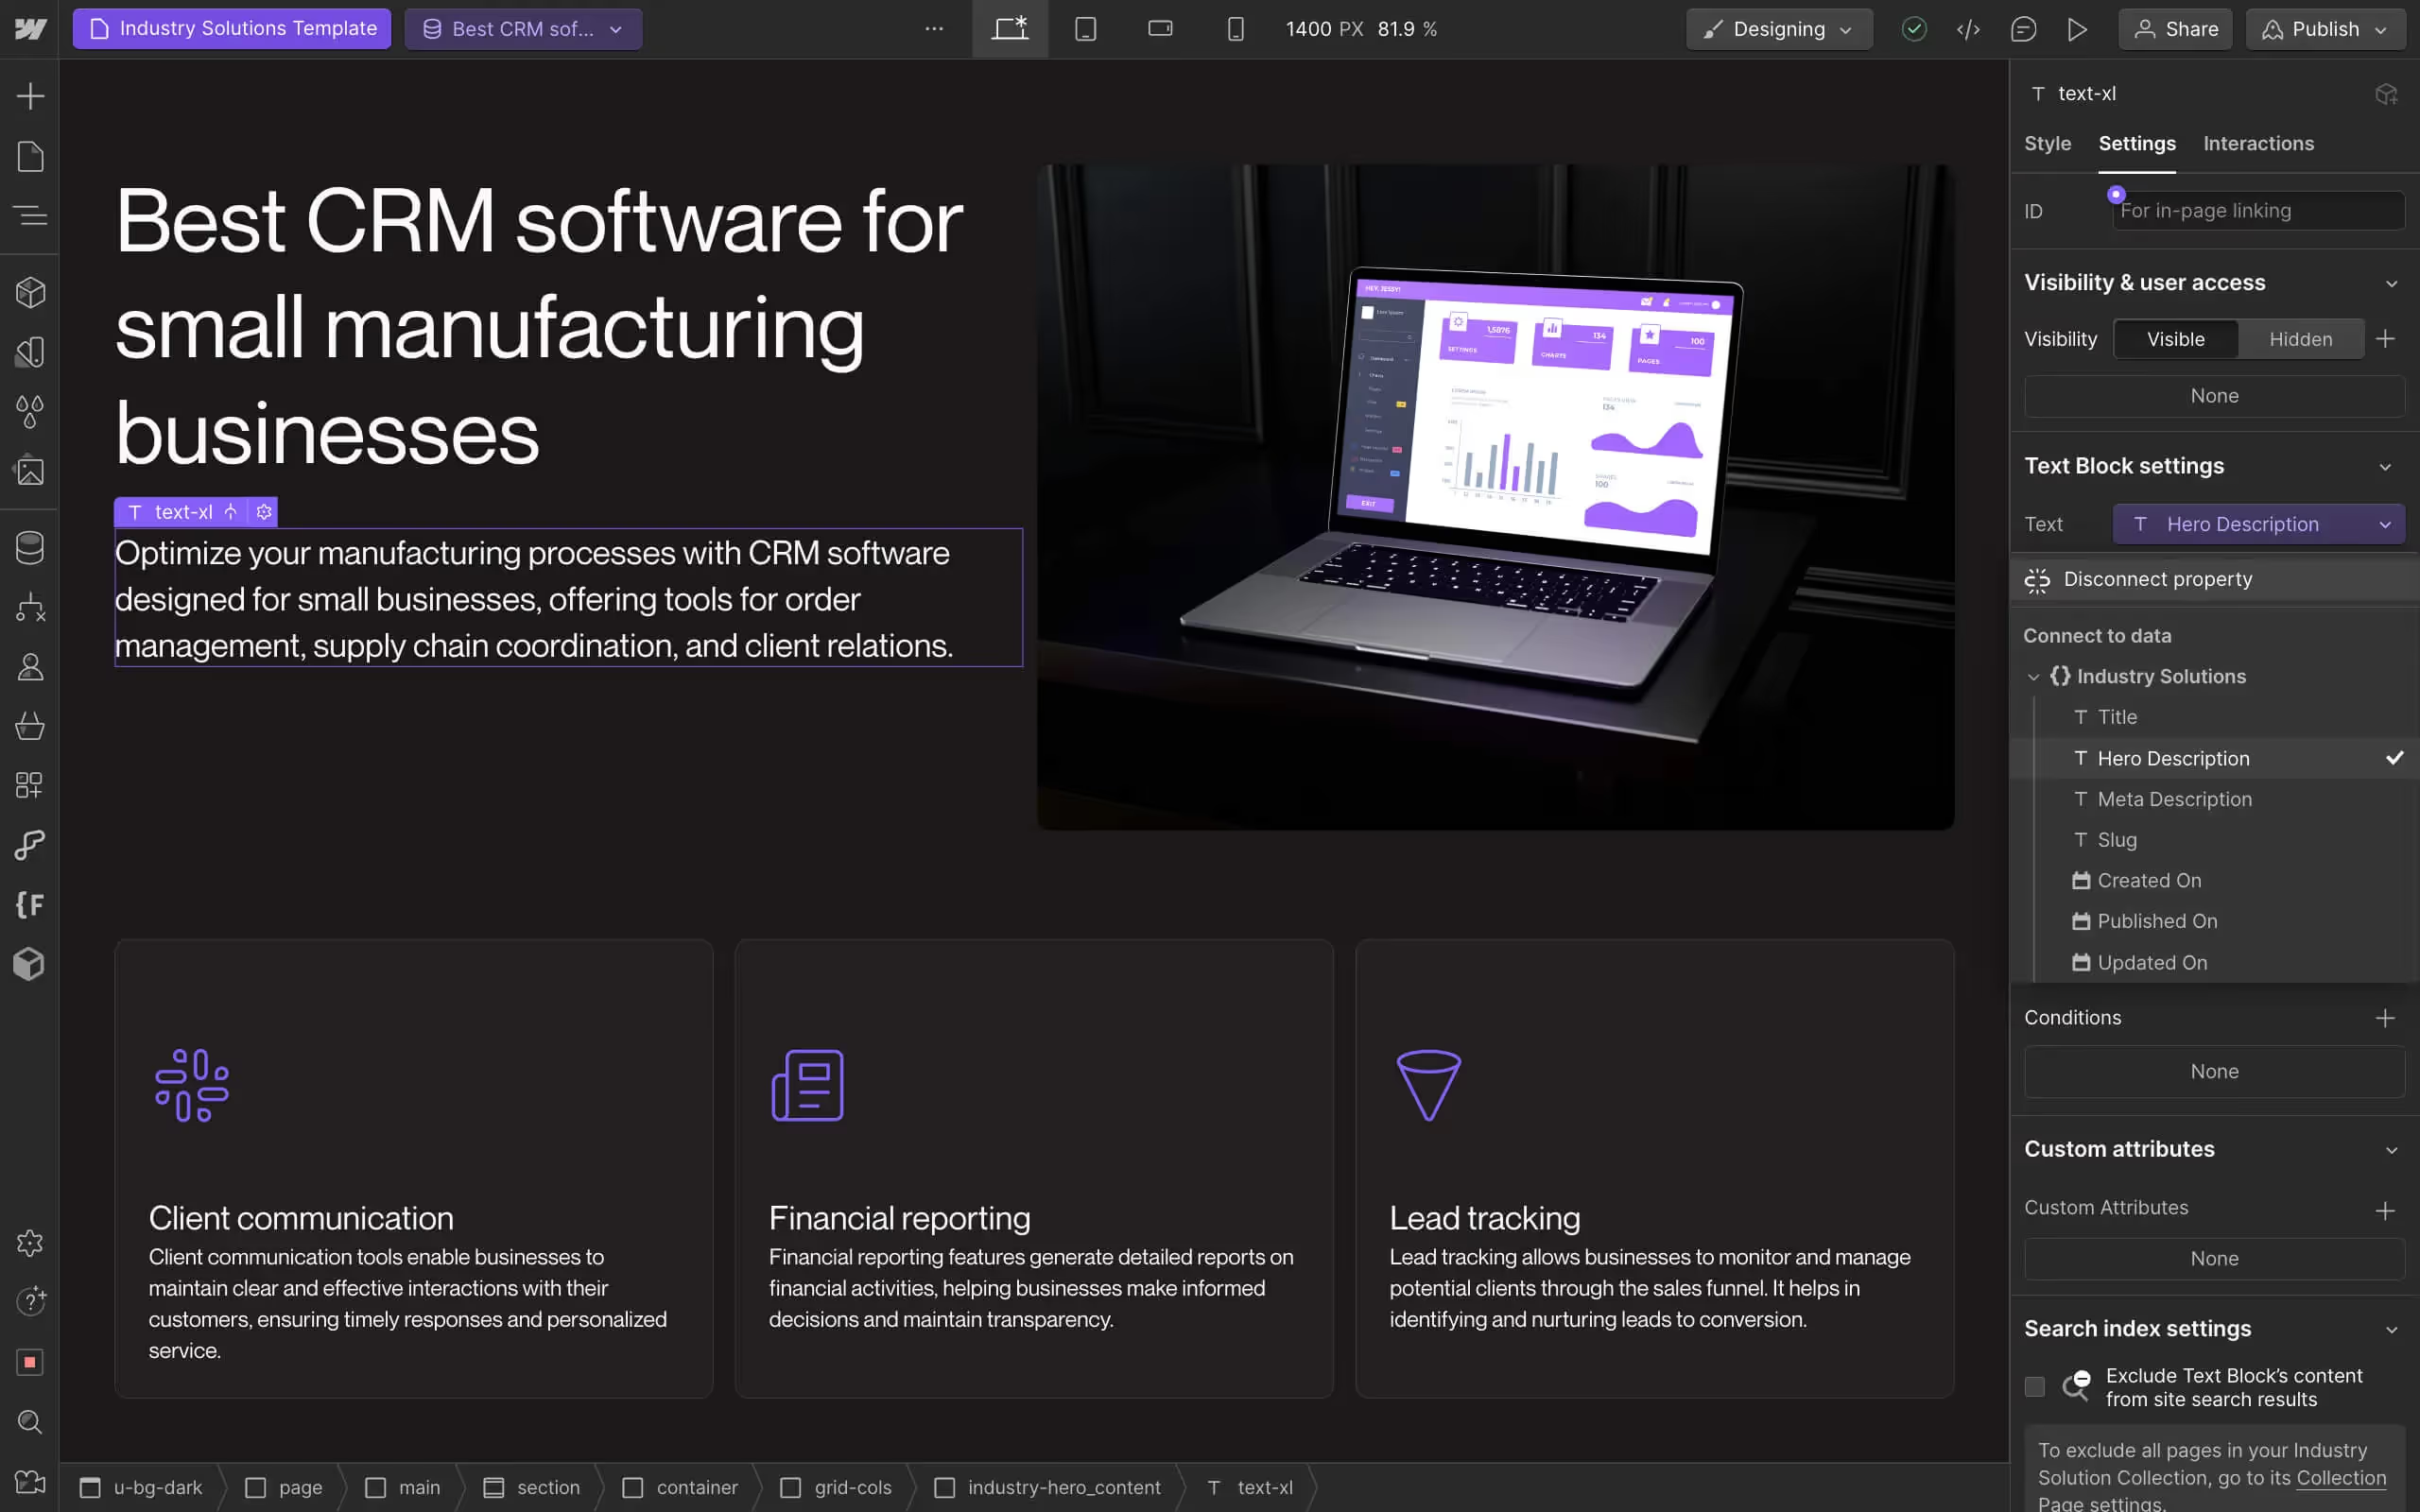
Once all your fields are connected to the page, we’ll move on to syncing Airtable data with Webflow CMS.
Step 4: Integrating Webflow CMS with Airtable (using Whalesync)
Whalesync is a straightforward and powerful tool that lets you connect data across apps like Airtable, Hubspot, Webflow and more. We’ll use it to connect Airtable and Webflow, and build a two-way sync between them.
Setting Up Whalesync
1. Sign Up and Log In:
- Go to the Whalesync website and sign up for an account.
- Log in to access the Whalesync dashboard.
2. Connect Data Source & Webflow:
- Choose your data source,(Airtable in our case), and Webflow, and authorize both on Whalesync.

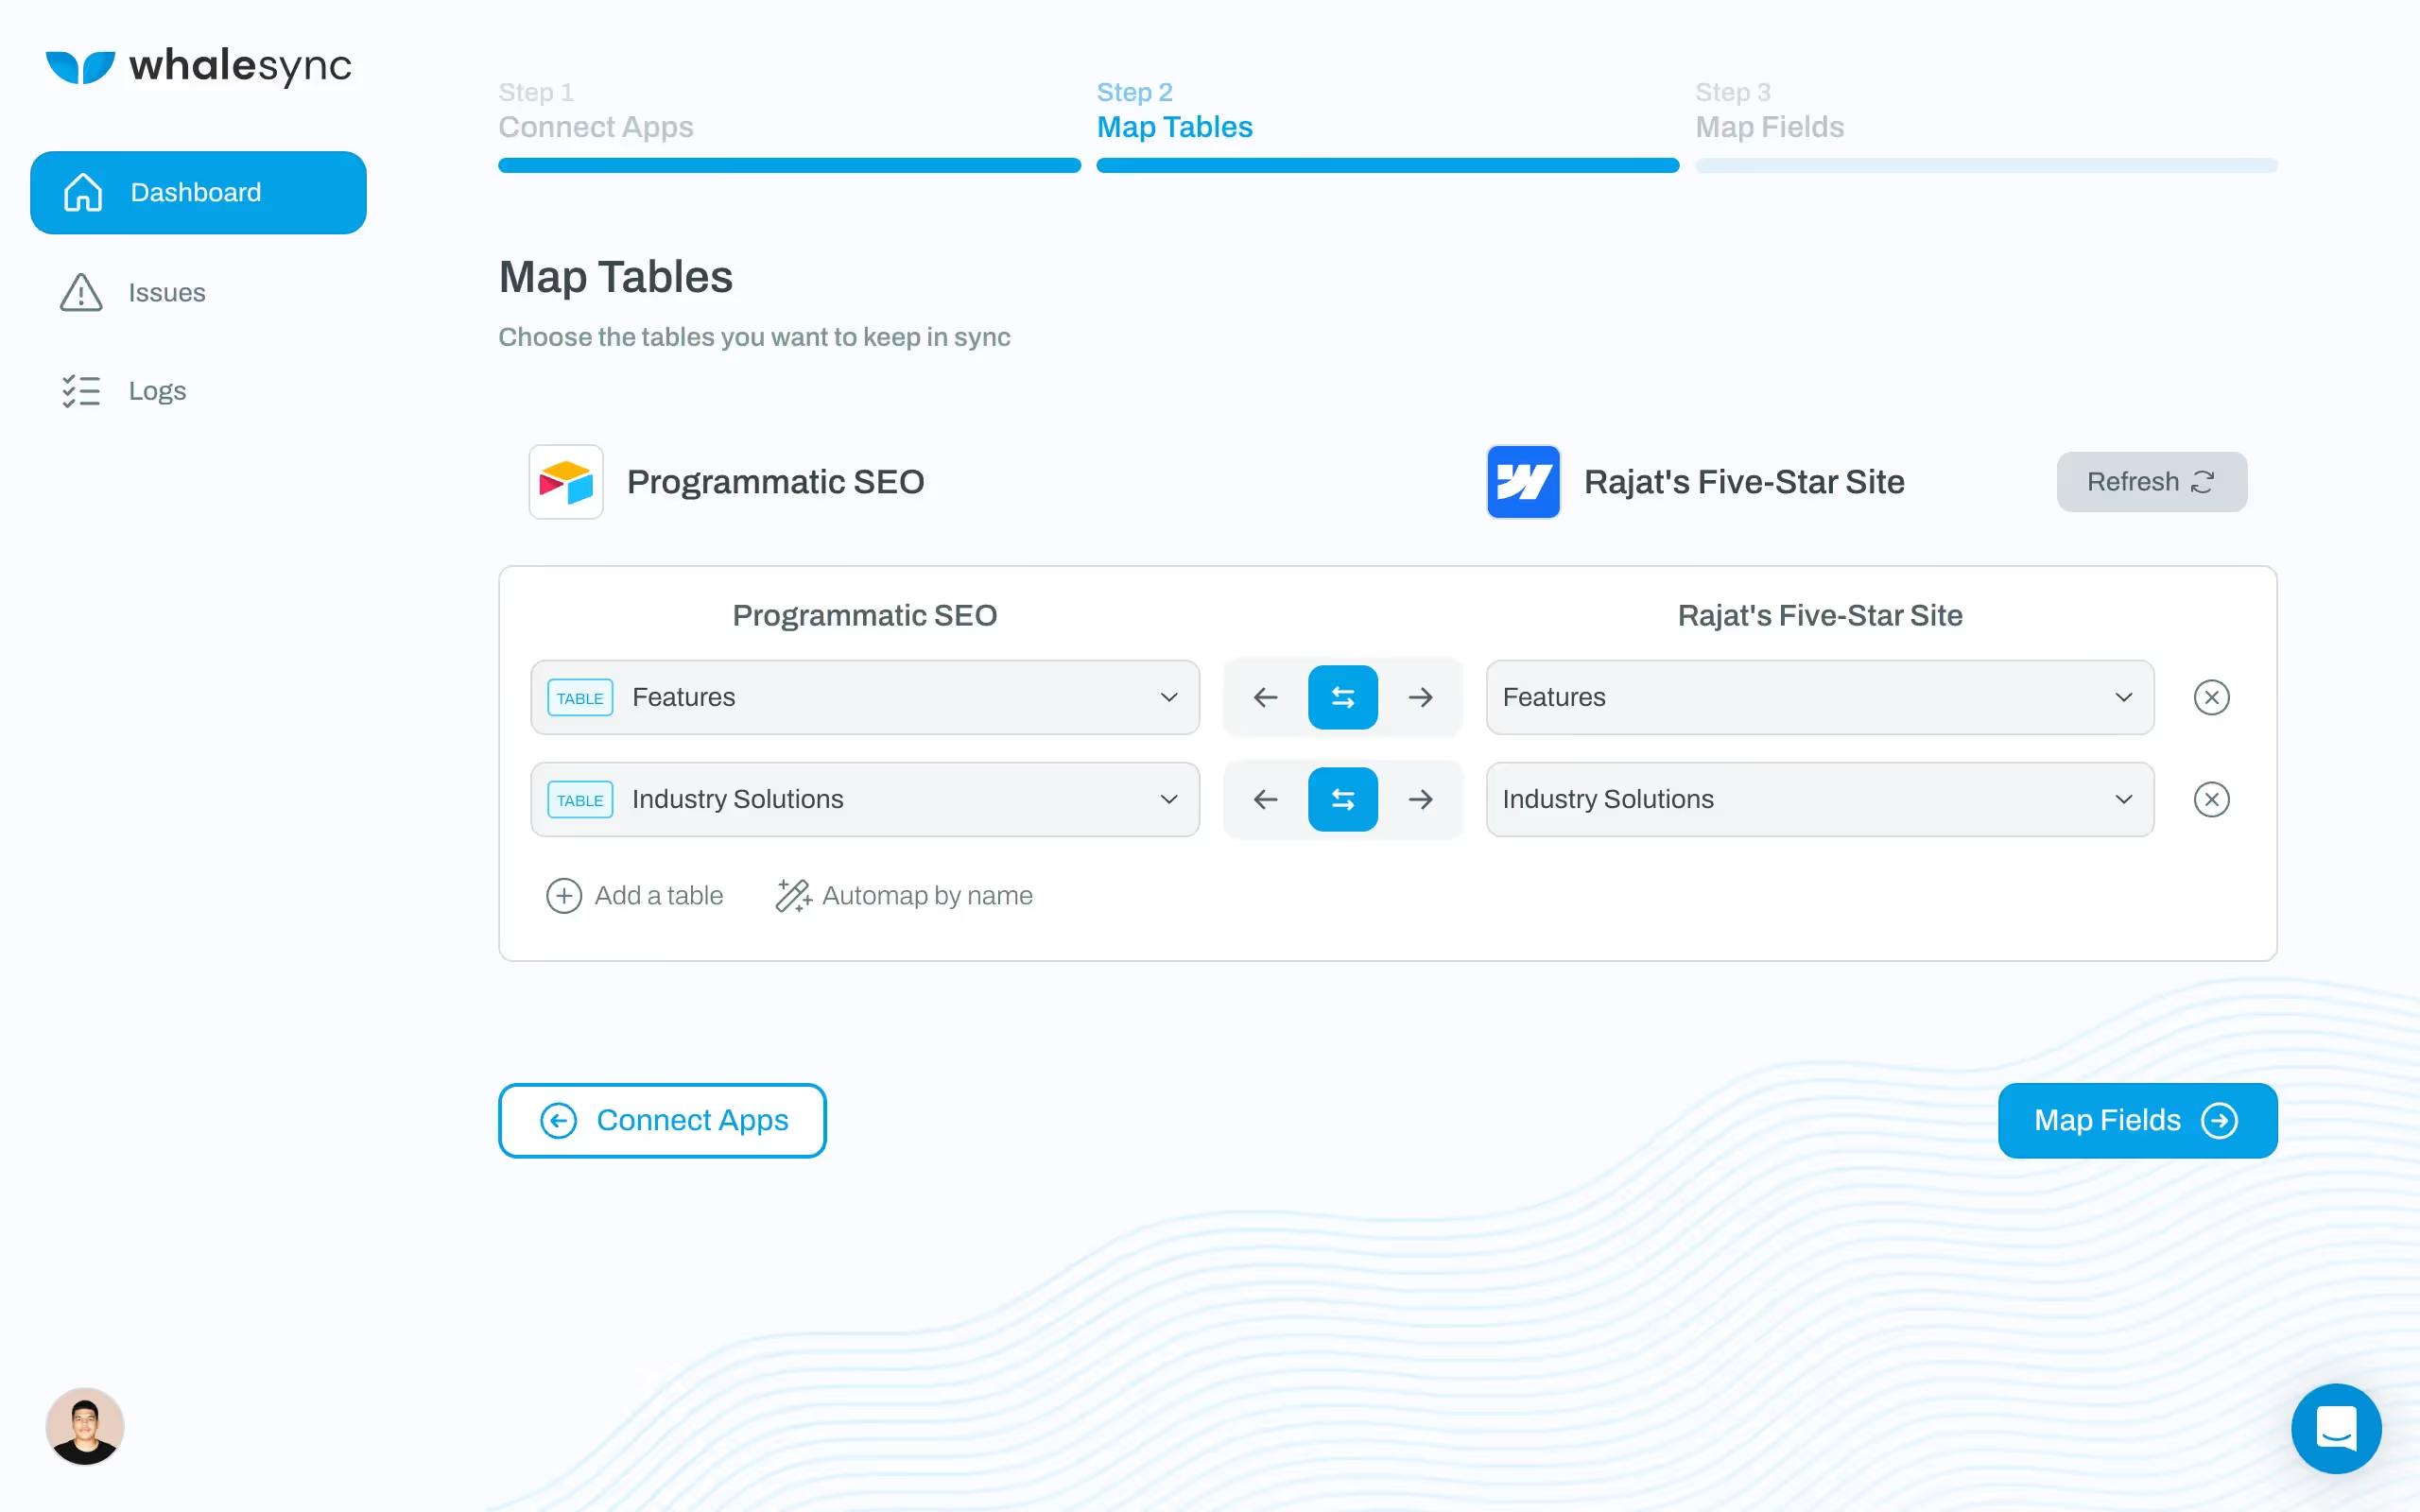
3. Map Tables:
- Map the tables in Airtable to the matching CMS collection you made. (Whalesync does this for you automatically, but always good to double check)
4. Mapping Your Fields:
- Map the fields from your data source to the corresponding fields in your Webflow CMS collections.
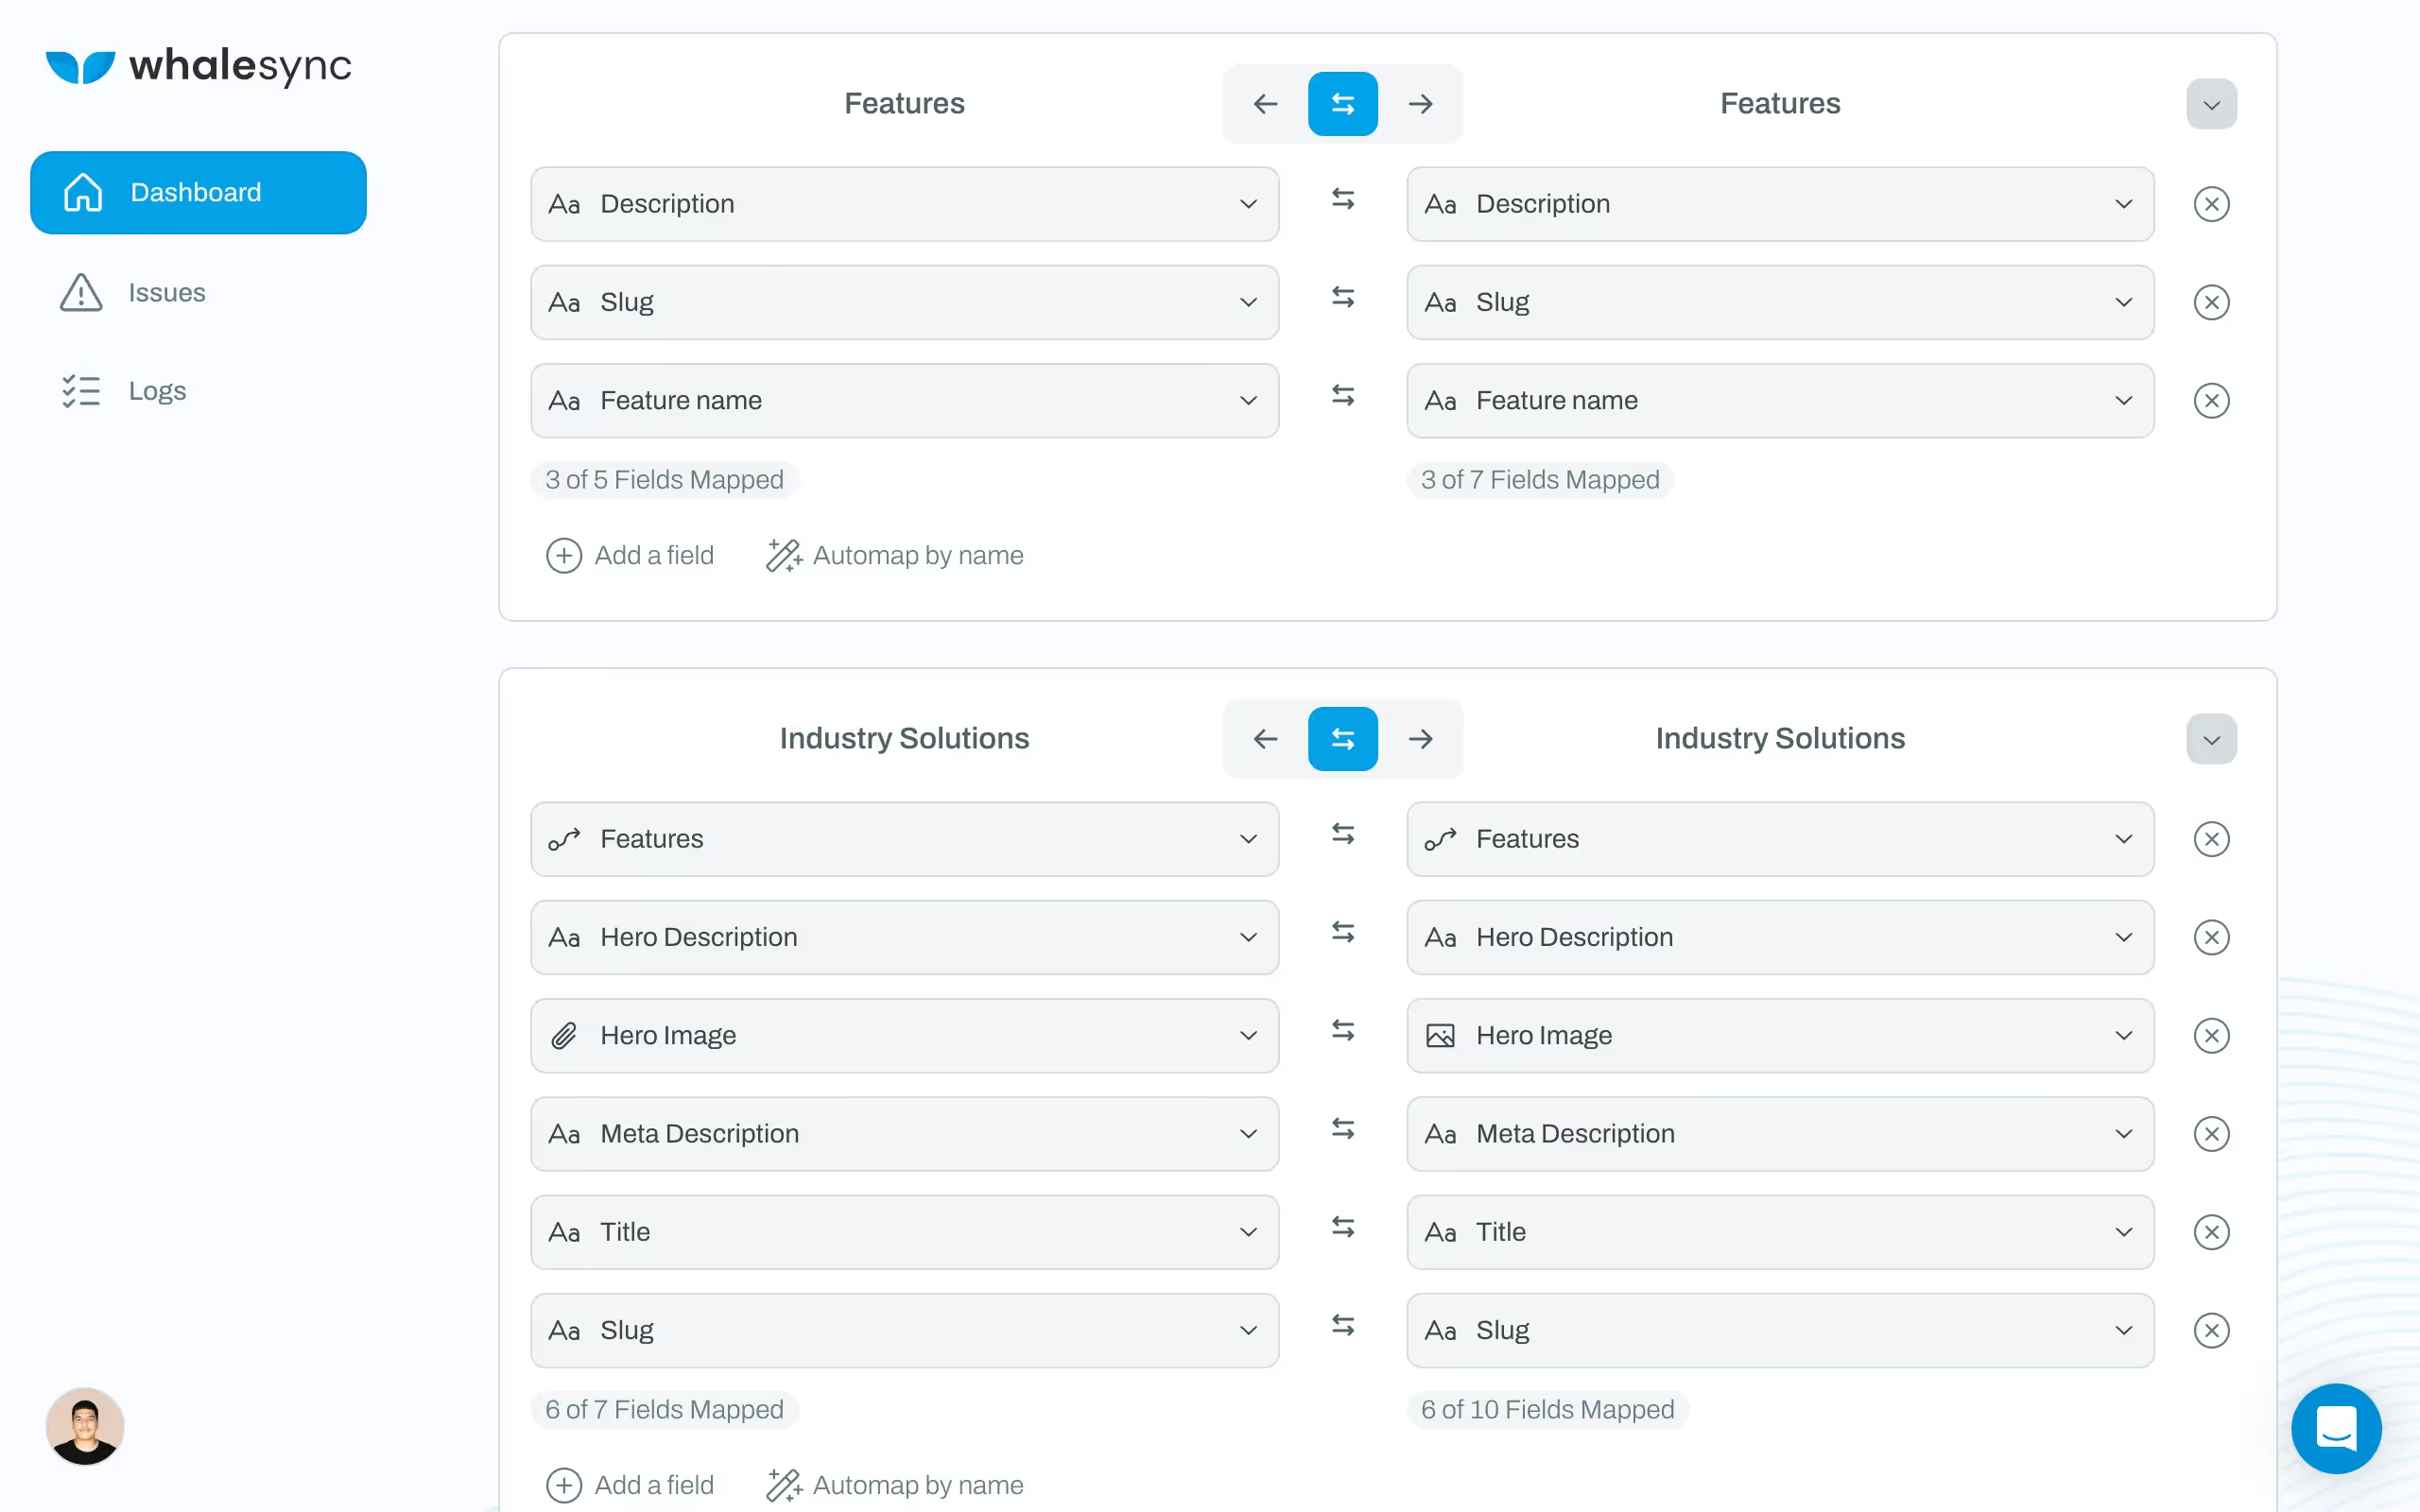
Syncing Data to Webflow
1. Initial Sync:
- After you’ve mapped your fields, save the base, and perform an initial sync to transfer the data from your source to Webflow.

- Once sync is complete, check your Webflow CMS to ensure the data has been populated correctly.
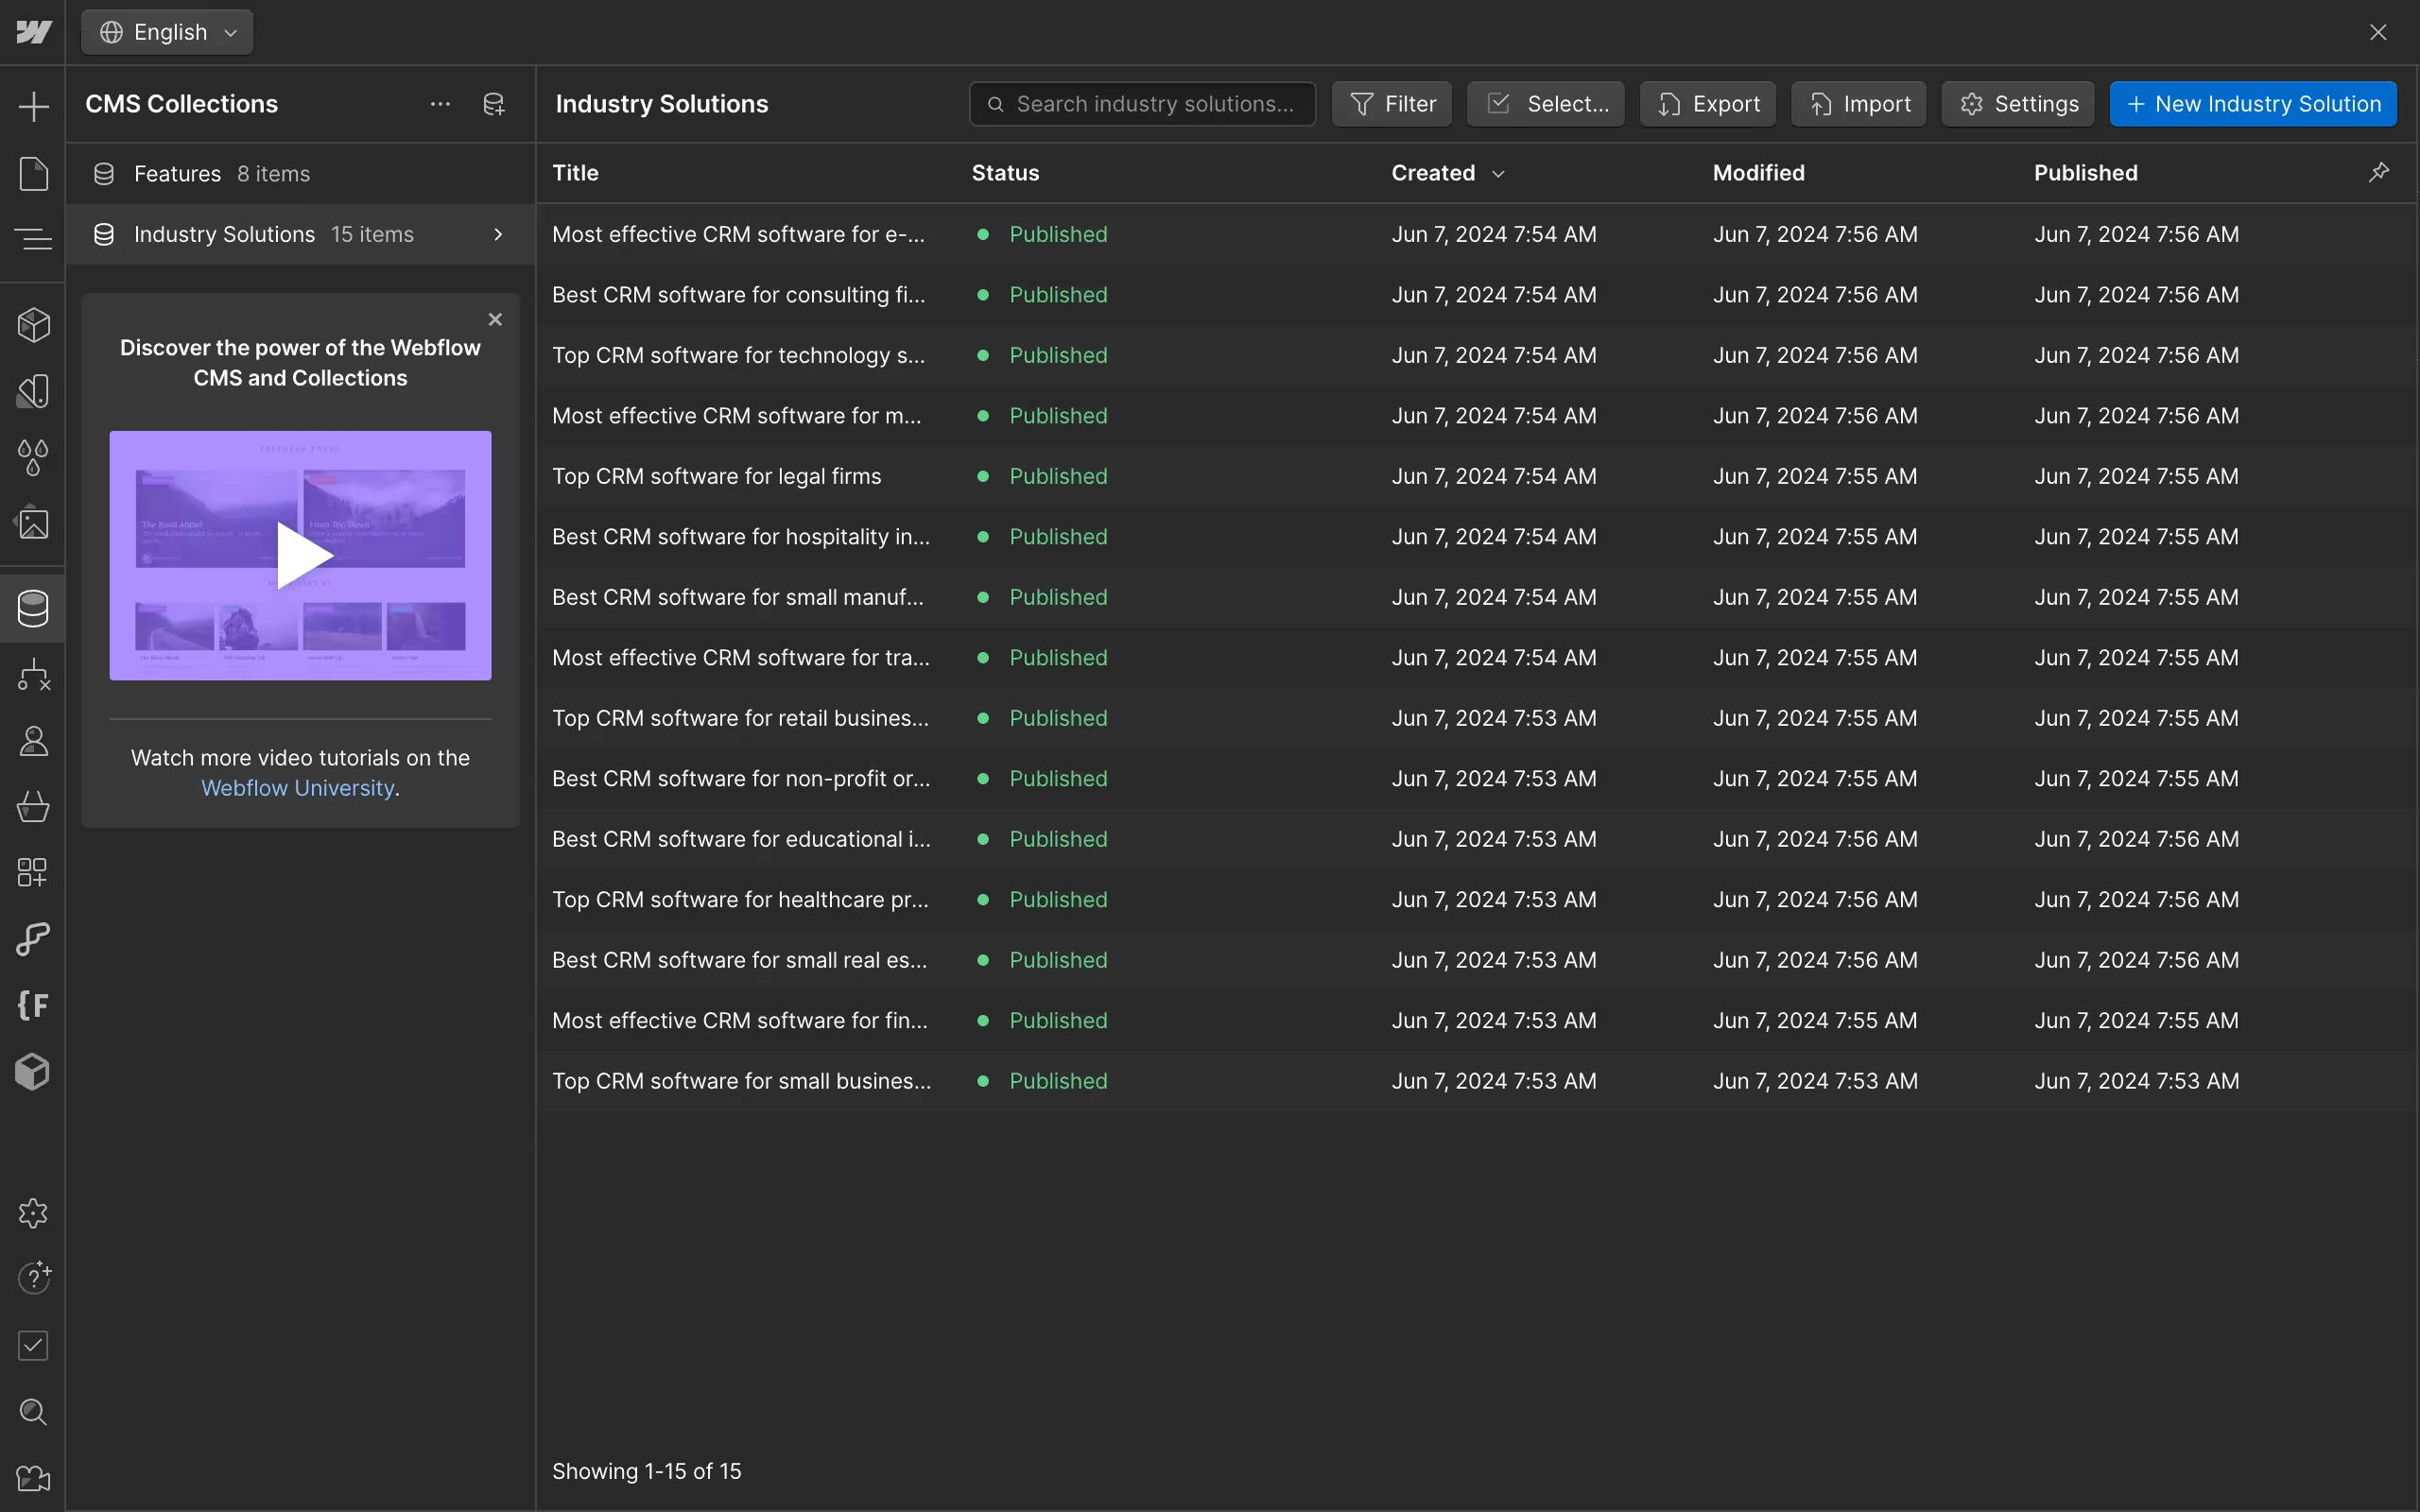
Congratulations! You’ve now synced all your content from Airtable to Webflow! pretty cool right?
Since Whalesync supports real-time updates and has a two-way sync, any changes you make on Webflow CMS, will be replaced on Airtable database, and vice-versa.
Pro Tip: If you encounter any issues during the sync, check the Whalesync dashboard for error messages and refer to the documentation for troubleshooting steps. Common issues might include authorization problems or incorrect field mappings.
Next, we'll explore how you can use Webflow API method to achieve similar results.
Step 4: Integrating Webflow CMS with Airtable (using Webflow API)
Integrating Webflow CMS with Airtable using the Webflow API provides a powerful and flexible way to manage your data, but it requires a bit of coding knowledge, particularly with Node.js and libraries like Express.js. Here’s an overview of how you can approach this integration with APIs.
Getting Started with Webflow API
To begin, you’ll need to familiarize yourself with the Webflow API. Webflow offers a comprehensive guide and starter project that walks you through the basics of using their API. This will help you understand how to interact with your Webflow CMS programmatically.
Understanding Airtable API
Next, you'll need to study the Airtable API to fetch and send data between Airtable and Webflow. The documentation provides detailed instructions on how to access and manipulate your Airtable data.
Setting Up Webhooks for Live Updates
If you need real-time updates, you’ll need to set up webhooks from both services. This will allow your server to listen for changes and automatically send data back and forth between Airtable and Webflow.
Once you’ve implemented all of the above, you would have replicated Whalesync’s functionality using code.
For a detailed guide on setting up a server to use the Webflow API securely, you can check out this 40-minute video by Samuel Gregory where he goes step-by-step to achieve this.
What’s New in 2025 for Programmatic SEO
Programmatic SEO has evolved a lot in the past year. Search engines and AI assistants now expect structured, high-quality, and fresh content, not just mass-produced pages. Here are the biggest changes you should know:
- AI copilots for SEO – Tools like AI SEO Copilot and Slater now flag missing meta tags, schema, or duplicate titles before you hit publish.
- Webflow CMS improvements – Single-item publishing, branching, and localization make it easier to manage large programmatic builds directly in Webflow.
- Structured data at scale – JSON-LD schema can now be injected across CMS templates using apps like Slater or custom code, making programmatic pages more AI- and SEO-friendly.
- AI-driven content workflows – You can use AI to draft titles, descriptions, and snippets for hundreds of pages, but human review is non-negotiable to keep quality high.
- AI search visibility – Engines like ChatGPT, Gemini, and Perplexity increasingly pull answers directly from programmatic pages. To win those mentions, your content must be well-structured, updated, and cite-ready.
Whalesync vs Webflow API: Comparison of Methods
The method you choose to set up programmatic SEO on your website depends or a lot of factors. Here’s a quick comparison to help you make an informed decision.
Which to choose?
- Whalesync: Choose Whalesync if you want a quick and easy solution without coding. It’s ideal for non-technical users who need real-time sync and can handle the subscription costs.
- Webflow API: Opt for the Webflow API if you need advanced customization and control over your data integration. This method is best for those who are comfortable with coding and require a highly scalable solution.
Both methods have their own advantages and are suited for different use cases. Consider your project's requirements, your technical capabilities, and your budget when making a decision.
Conclusion
By now, you should have a clear understanding of how to implement Programmatic SEO with Webflow CMS for your specific use case. Whether you go for Whalesync or Webflow API, the steps outlined in this guide will help you efficiently create dynamic, SEO-optimized landing pages for your use case.
If you need more understanding of these methods, be sure to read Webflow documentation & Whalesync documentation
